- Home
- Needlepoint
- Gobelin Stitch
Gobelin stitch and its variations
Discover the secret to creating stunning textures and patterns in your needlepoint with the Gobelin stitch—a simple yet incredibly versatile technique.
- Whether you’re a beginner looking for a stress-free way to improve your stitching.
- Or an experienced embroiderer exploring new variations.
This guide will help you master the essentials with step-by-step techniques and troubleshooting tips.
No More Frustration!
If you've ever struggled with messy stitches or confusing tutorials, you’re in the right place. This guide breaks down the Gobelin stitch into easy-to-follow steps so you can achieve polished, professional-looking results without the guesswork.
Learn how small adjustments—like changing thread types or stitch angles—can transform your designs, from rustic wood textures to elegant shading effects.
Ready to stitch?
Let’s start with the foundation of any great embroidery project—choosing the right threads!
Choosing the Right Threads
The thread you choose can make all the difference, transforming your design from ordinary to extraordinary.
But with so many options available, how do you know which one is best for your project?
🧵 Wool Yarn – Perfect for adding rich texture and warmth, making it ideal for rugs, upholstery, and heirloom-quality pieces that need durability.
✨ Metallic Threads – A great choice for accents and highlights, adding a subtle shimmer to your work. These can be trickier to work with but are worth the effort for a dazzling effect.
🎨 Pearl Cotton – A twisted cotton thread with a lustre. This come in different thicknesses but size 5 is suitable for fine canvases.
💡 Pro Tip: The type of thread you choose will affect both the look and feel of your final piece. Before selecting, consider how your embroidery will be used—will it be a decorative wall piece or something that needs to withstand wear and tear?
Straight Gobelin Stitch
Now that you have a better understanding of threads, it’s time to start stitching! Let’s begin with the Straight Gobelin Stitch, one of the simplest and most versatile foundation stitches in needlepoint.
 Straight gobelin worked side by side
This is a simple straight stitch that covers the desired number of canvas threads, in this case, four.
I used Pearl cotton number 5, so that the individual stitches showed clearly in the closeup photograph. Wool can be a little fuzzy, making it more difficult to see the formation of the individual stitches.
In the photo I am in the process of stitching a second row, reusing the hole from the previous row.
It isn't always necessary to work into holes adjacent to each other.
In the second sample, I shifted each stitch slightly diagonally, creating a staggered effect rather than a rigid row-by-row approach. This technique adds movement and can resemble woven or tiled surfaces.
 Straight gobelin worked by moving each stitch by one canvas thread each time.
Slanted Gobelin Stitch
However, we can vary things by making the stitches themselves diagonal. This helps to cover the canvas better.
 Slanted gobelin stitch corner worked in Pearl Cotton number 5.
In this next photo I worked over three canvas threads horizontally and vertically. I began by working from left to right along the row, until I reached the corner. I then brought the needle back up below the previous stitch to travel down the canvas.
Although I used the same thread you can see how it leaves less canvas showing under the stitches.
 Straight and slanted gobelin worked in wool yarns.
When I switch over to wool you can see how the fuzzy yarn makes the stitches less defined and softer looking.
In this second photo, I started with straight gobelin in the left sample, over three canvas threads, using one strand of persian wool.
I used the same wool in the second sample but this time my Slanted Gobelin stitches crossed three threads vertically and just one horizontally.
The right hand sample is also slanted gobelin, but worked in a single strand of a thicker Danish wool, called Cewec Zephyr. I was lucky enough to pick up a whole basket full of different colours of this wool from a local charity shop here in the UK.
Encroaching Slanted Gobelin
Now that you’ve mastered the Slanted Gobelin Stitch, let’s take it one step further with the Encroaching Slanted Gobelin Stitch—a subtle but powerful technique that creates soft, blended shading perfect for replicating natural textures like fur, hair, and gentle gradients.
Unlike the standard Slanted Gobelin Stitch, where stitches align in neat rows, the Encroaching Slanted Gobelin Stitch slightly overlaps previous stitches.
This overlapping technique eliminates harsh lines, allowing for a smoother transition between color changes or shading effects.
In the next photo I use three shades of blue, and worked two rows in each colour.

Begin with a row of slanted gobelin stitches, just as we did before.
For the next row, position each stitch so that its top slightly overlaps the bottom of the stitches in the tow above. In this sample I took the needle to the back one canvas thread above the one used for the previous row.
This helps to disguise the hole that is being used.
By choosing colours or tones that only vary slightly (not as obviously as those I demonstrated with) you can get a soft blend.
Alternating Straight Gobelin
With the Alternating Straight Gobelin stitch, you can achieve the effect of a brick wall with ease.
The secret lies in leaving a gap between each stitch on your first row and working up into the first stitch on the next.
Let me show you how to do it, and the flexibility you'll have with this stitch, which can be worked over any even number of canvas threads (I used six on this interlock canvas).
For more about the different types of needlepoint canvas click here.
 Alternating Gobelin row 1
 Alternating Gobelin row 2
 Alternating Gobelin after 3 rows
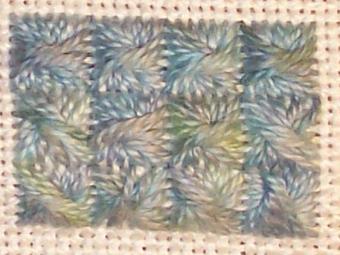
Parisian stitch

Want to add a touch of elegance to your needlepoint designs? The Parisian stitch is a must-have skill, and it's surprisingly simple to learn.
By alternating long and short stitches, you can create a beautiful, textured effect - like the lush grass in the photo above, achieved by mixing strands of different coloured crewel wool in the needle.
I worked the longer stitches over 4 canvas threads and the shorter stitches over two.
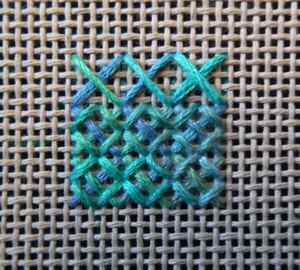
Double Parisian stitch

Fancy a woven effect? By working two long followed by two short gobelin stitches then alternating those in the following row, you end up with double parisian stitch.
This could represent a basket, a fence or hurdle depending on which way you hold the canvas.
Hungarian stitch

If you work a group of three straight gobelin stitches, miss a hole and repeat, you end up with a diaper pattern that looks like little diamonds.
In the following row, use the hole you missed on the last for the longer stitch.
Worked in two colours, as in the photo, the diamonds jump out at you, whereas using a single colour things are more subtle but still beautiful.
I worked over 2 and 4 threads in my sample, using crewel wool.
Bargello needlepoint
Did you know that the straight gobelin stitch is also used in Bargello needlepoint? Here the stitches are commonly worked over the same number of threads, but are stepped up or down a row of the canvas as you work. The interest is introduced by gradually varying the colour for each row.
You can find more information along with a free pattern for Bargello by clicking the links.
Grab Your Yarn
With so many variations of the Gobelin stitch (and thread options) to choose from, it can feel overwhelming to know where to start. But don't let that stop you!
Take a deep breath and simplify your next step: choose a thread that resonates with your design vision and practice the Slanted Gobelin Stitch. Yes, it's that easy! With this one stitch, you'll be able to create a stunning texture that will expand your needlepoint repertoire.
Remember, the benefits of learning the Gobelin stitch are well worth the effort. You'll be able to create intricate patterns, and add texture to your designs. And with practice, you'll gain confidence to experiment with different threads and techniques, unlocking creative possibilities.
So, take the first stitch today and start creating. You've got this! With every stitch, you'll be creating something new. Fancy, fantastic, and fascinating - the world of Gobelin stitch awaits!
What did you think of this page?
Did it give you all you needed or did anything else spring to mind? If there was something missing give me a shout – or let me know if this page proved helpful (do let me know which page you are commenting on).
Would you like a direct reply? Just pop your email address below, and I'll be in touch.
Stay connected between projects
If you’d like occasional updates from my embroidery room, including new patterns, gentle tips, and little things I think you might enjoy, you’re warmly invited to join the Stitchin’ Times newsletter.
No pressure. Just a friendly note now and then to keep you inspired.
You Might Like These
Needlepoint Patterns: Discover Beautiful Designs for Your Next Project
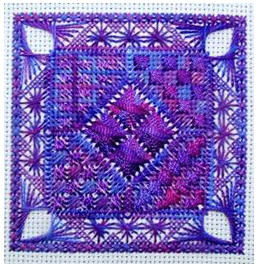
Needlepoint patterns that use textured needlepoint stitches and over-dyed threads make up the Textures to Dye for range
Rice stitch - an easy needlepoint stitch to learn
Try Rice Stitch - one of the simple needlepoint stitches that you can use to give many different effects
Needlepoint Stitches: Choose the Right One for Stunning Designs
Struggling to choose the right needlepoint stitch? Get expert tips on selecting stitches for texture, direction, and style. Learn effortlessly
Copyright © Carol Leather - 2006-2024
About Me - Contact Carol - Privacy Policy - Site Map - Testimonials
Please do not copy the content of this site. It is protected by Copyscape.
Copyright © 2006- www.needlework-tips-and-techniques.com All rights reserved