- Home
- Cross Stitch
- Fractional Stitches
Fractional stitches
add detail to your cross stitch
"Fractional stitches? I have only just learned how to do basic cross stitch!" is the reaction I normally get when I ask if a stitcher is looking for designs with more detail.
Although they may sound scary and the charts more complicated, quarter and three quarter stitches are quite simple to work.
Designs that consist of whole cross stitches only tend to have a jagged "stair-step" appearance to the edges of blocks of colour, whereas fractional stitches can add diagonals and help to make things look a little more natural.
They are easier to work on an evenweave fabric than on Aida, as you do not have to find the centre of the Aida squares and pierce them with the needle. If you haven't tried evenweave cottons and linens yet, nip over to my page that explains the process first.
But let's start with the half cross stitch.
Half Cross Stitch
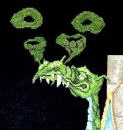
The simplest fractional stitch is the half cross stitch. Just as it sounds, this is the first leg of a cross stitch. It is sometimes used to depict sky or water or something semi transparent.
I use it in my Old Smokey dragon design to represent the smoke rings that the dragon and wizard are blowing, as shown in the close up detail photograph, right.
This stitch is also commonly used in needlepoint where it is known as tent stitch.
Half cross stitch can be worked on Aida, evenweave or canvas, easily.
Quarter Stitches
Quarter stitches are easier to work on evenweave rather than Aida.
In the diagram below, which represents working the complete crosses over Aida, the tiny pink stitches are quarter stitches.
On Aida fabric you will need to push your needle down as close to the centre of the Aida block as you can, with a sharp pointed crewel needle.
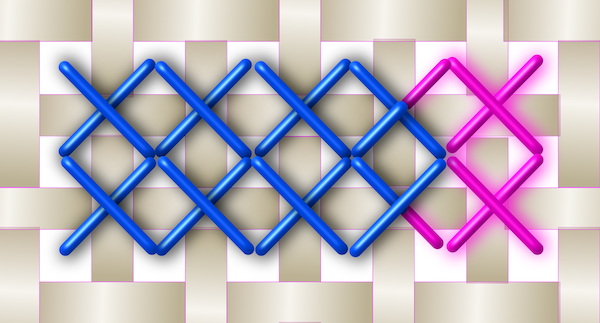 Worked on Aida Fabric
The diagram below shows the same design, but this time worked on evenweave fabric. Each cross stitch is worked over two fabric threads leaving a hole in the centre of the stitch. When creating a quarter stitch you therefore have a central hole into which you can insert the needle. This gives a more accurate end result.
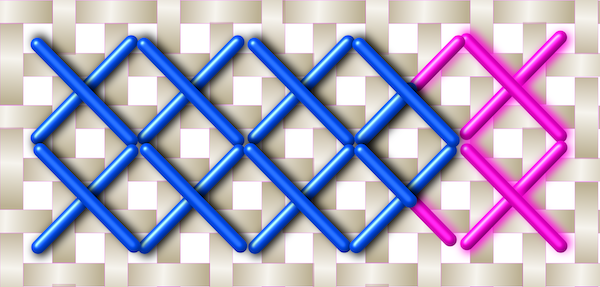 Worked on evenweave fabric, over two threads
We will come back and take another look at the diagrams above in a moment.
Reading the Chart

The chart may show small symbols as in the diagram above. These tiny symbols represent both quarter and three quarter stitches.
Before stitching these, study the chart to see which section you wish to be more dominant. This will tell you which stitches to work as quarters and which to work as three quarter stitches.
If both need to feature equally you can work two three quarter stitches as below.
Three Quarter Stitches
The section of chart shown above can be stitched as two quarter stitches with a backstitch line separating the two, but more commonly we would use a three quarter stitch for one of the symbols.
By using the colour of the foreground object for the three quarter stitch it makes the tiny quarter stitch less significant and "pushes it" into the background. In turn this helps to make the foreground object look more "in focus".
The method used to work the three quarter stitch will depend on which quadrant contains the quarter. If possible try to have the top stitch laying in the same direction as the rest of the stitches in the area.
If you look back at the first two diagrams, you will see how much neater the second one looks as the stitches lay in the correct order.
Fractional Stitches with no Dominant Shape
But what if it isn't easy to tell which object is further forward?
In this instance you can use three quarter stitches for both tiny symbols as shown in the diagram below.
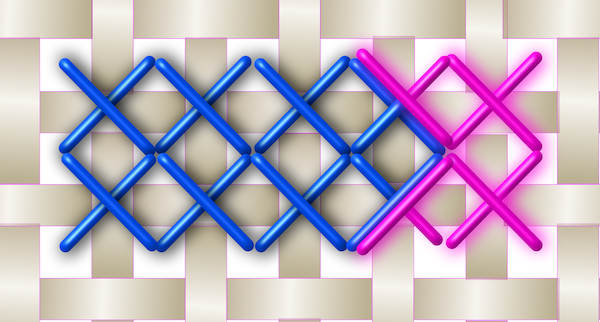
To keep them distinct you may prefer to work the stitches in the opposite order; the half stitch first then use the quarter stitch to "tie" it down. Again a backstitch can be worked between the two stitches to separate the areas clearly.
Hopefully this little article has helped to demystify the various fractional stitches for you. If you have any questions, however, please use the form on the Contact page to get in touch.
What did you think of this page?
Did it give you all you needed or did anything else spring to mind? If there was something missing give me a shout – or let me know if this page proved helpful (do let me know which page you are commenting on).
Would you like a direct reply? Just pop your email address below, and I'll be in touch.
Stay connected between projects
If you’d like occasional updates from my embroidery room, including new patterns, gentle tips, and little things I think you might enjoy, you’re warmly invited to join the Stitchin’ Times newsletter.
No pressure. Just a friendly note now and then to keep you inspired.
